Baking Diary – Log 11 – 19.05.2012
In the previous posts in this blog, you have learned how to laminate your dough.
Here is my recipe with detailed instruction pictures at every step, suitable for beginners.
Here is the review of my croissant chronicle through 6 typical cases, including common mistakes, tips to avoid and lessons learned.
Yesterday was a rainy summer day, again, in Finland. I was bored, so I, as usual, rushed into the kitchen with another ambitious project. I intended to make some croissants for. At the end of the laminating process, a question suddenly popped up in my mind.
“What else I can do with this hard-worked dough I’ve made? All the pain and time and efforts, just for some crescent pastries?”
No, I don’t think so.
This dough is actually very versatile in a way that you can combine it with many different filling and shape it in various different shapes that can raise people’s appetite to unlimited level. 🙂 In this post, I would like to show you some of the popular fillings and shapes of Danish Pastries, which will literally make you drool over them.
So with the purpose to extent the use Laminated Dough, I double my usual croissant dough batch. (YAY! More Danish pastries for me!) Here it is the next morning (meaning today), Look how it puffed up in the fridge after 1 night. I never have the chance to show you this, so here. 🙂
Don’t worry; just flatten it out using your rolling pin. And are you ready? Here goes my Danish Pastries’ Fillings and shaping Collection, with detailed instructions and pictures at every step, as usual.
Hope you guys enjoy!
——————————————–
Filling
SAVORY
1. Cheese and Ham of your choice
- While shaping your croissants, simply place a slice of cheese and one of ham at the center, like this.
- Roll them up as usual.
- And bake.
- There you have it, your savory croissant, super yummy, and very suitable for either breakfast or lunch. 🙂
2. Fresh cheese – cream cheese or ricotta.
3. Meat fillings
4. Liver Pate
5. Vegetable and herb mixtures
——————————————–
SWEET
1. Chocolate – Is a wonderful choice for sweet filling. Cocoa nips, dark, semi-dark, milk? All is excellent. Chips, or bars? Every shape can be used.
2. Dried fruit, fresh fruits, or sweetened fruit – like apricot, peach, apple, plum or raisin complement the flavor of butter very, very much, and also give your pastries a hint of sourness, yummy!
3. Jams – like apple or plum, pineapple, or berries. I have one apple in my fridge right now, so I will show you how to make your own apple filling. 🙂 What you need is 1 green apple, ½ cup of water, 1 tbsp. brown sugar, 1/8 tsp. of cinnamon powder, and 1 tbsp. raisin. (Enough for 6 pastries) (References: The Good Cook)
- Peel, core and slice the apple into thin slices.
- Place them in a saucepan with water, turn on the heat and let them sit until soft, about 15 minutes, and let the water evaporated a bit.
- Beat them into a pulp then stir in sugar, cinnamon and raisin. Done!
——————————————–
4. Cinnamon Butter – is a wonderful sweet filling for Danish pastry. Imagine your favorite sticky bun, now made with Danish laminated dough, only the best. To make this flavorful butter, simply cream 30g butter at room temperature with 2 tbsp. of brown sugar and 1 tsp. of cinnamon powder. And you have it. (Enough for 6 pastries) (References: The Good Cook)
——————————————–
5. Nuts paste – Like almond, pistachio, pecan, or hazelnut, basically every of your favorite nuts (well, except for coconut, since technically, it is a dry drupe ;)) I have some grounded almond in my pantry right now, what a coincidence, so I will demonstrate how to make almond paste. What you need is ½ tbsp. of butter, 45g sugar, 45g grounded almond, and enough beaten eggs. (You will know what is enough in the next steps) (Enough for 6 pastries) (References: The Good Cook)
Cream butter with sugar. Stir in grounded almond and enough egg just until you achieve a pliable consistency, like this. (I used about of beaten egg, it might varies a bit due to the dryness of your almond, but don’t worry about the leftover eggs, we can use it as egg wash for our pastries later)
——————————————–
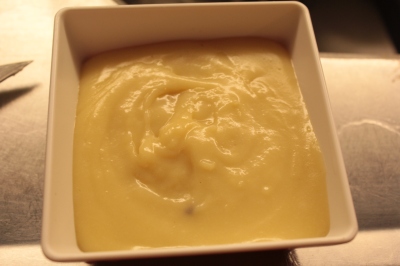
6. Confectioner Custard (or egg yolk custard, or pastry cream, or pâtisserie à la crème) – I had searched for months a smooth, lump-free vanilla cream without satisfied result. Luckily, a friend of mine, Bolas De Fraile from Discussion Cooking forum, taught me this recipe and I have fallen in love since. (I cut the original recipe in third, enough for 15 pastries)
Ingredients
- 1 egg yolk
- 8g all-purpose flour
- 2/3 tbsp. corn four
- 75ml whole milk
- All simple sugar syrup made below
- 35g sugar
- Zest of ¼ lemon (optional)
- 30ml water
- 1/4 stitch of cinnamon (optional)
Method
- To make the sugar syrup – Heat the water + sugar until boiling, add the cinnamon stick and lemon zest to infuse, for 15 minutes.
- To make the custard
- Whisk egg yolk + flour +a bit of milk until reach thick paste consistency.
- Boil the rest of the milk in a heavy-bottomed saucepan. Then pour it into the egg yolk mixture, using a ladle, while whisking madly.
- Strain the mixture and the sugar syrup.
- Pour the mixture back into the saucepan, and cook under low heat until thicken.
- Cover the custard with plastic wrap very tightly. (I put it in a plastic piping bag and tighten 1 end with a rubber band) Let the custard cool completely into room temperature, and then chill in the fridge for another hour before using it.
You can also adjust the taste and texture of your custard cream by following the instruction below, from Joy of Baking:
- For lighter pastry cream – Fold in 40ml softly whipped cream to cooled pastry cream.
- For Chocolate pastry cream – Add 20g of finely grated bittersweet or semi-sweet chocolate to the hot pastry cream. Stir until melted.
- For Coffee pastry cream – Add 1 tsp. instant espresso or coffee powder to the hot milk.
- For Raspberry pastry cream – Add 20ml (or to taste) raspberry sauce to pastry cream.
——————————————–
7. Cream Cheese Filling (About 1-1/3 cups) (Reference: Wild Yeast)
Ingredients
- 226 g cream cheese
- 113 g sugar
- 19 g butter, at room temperature
- 28 g flour
- 21 g egg, lightly beaten, at room temperature (This is a little less than half a large egg. Save the rest of the egg to wash the pastries.)
- 4.5 g (1 t.) vanilla extract
Method
- Soften the cream cheese with a hand mixer on low speed.
- Add the butter and beat on medium speed until incorporated.
- Add the sugar in three portions, mixing well after each addition.
- Beat in the egg, then the vanilla.
- This can be made ahead and refrigerated for several days. Bring it to room temperature before using.
——————————————–
8. Almond Filling (About 1-1/2 cup) (Reference: Wild Yeast)
Ingredients
- 112 g butter at room temperature
- 112 g sugar
- 112 g almond meal (or you can grind blanched almonds finely in a blender or food processor)
- 35 g flour
- 50 g (one large) egg, lightly beaten, at room temperature
- 3.4 g (3/4 t.) rum
Method
- Blend flour and almond meal together.
- With a hand mixer, cream butter and sugar in a medium bowl.
- Add the egg little by little, mixing well after each addition.
- Beat on medium speed until light.
- Add the flour/almond meal mixture and mix until incorporated.
- Add the rum and mix well.
- This can be made ahead and refrigerated for several days. Bring it to room temperature before using.
——————————————–
Topping and Glazes
SAVORY
Toppings
- Grated cheese of your choice – Parmesan, cheddar, or mozzarella.
- Herb mixture – chopped parsley, or basil, or chopped garlic.
——————————————–
SWEET
Glazes
- Melted Chocolate
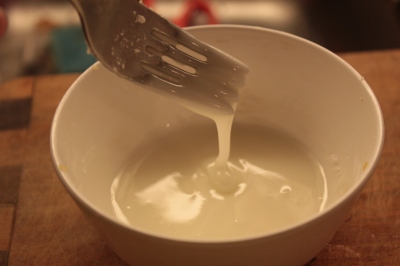
- Sugar icing – 1 1/4 confectioners’ (powdered) sugar, with 3 tbsp. milk (or lemon juice), and 1/2 tsp. clear vanilla extract. Add milk gradually, while mix well until you achieve a quite thick icing this this. (Reference: )
Topping – chopped roasted nuts, almond slices, or sugar pearl.
——————————————–
Shaping Danish Pastries
(References: Joe Pastry and The Good Cook)
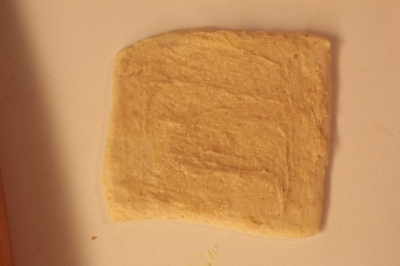
Shape and fill the Danish pastries in any of the following ways as show below. Remember to brush the squares with beaten egg first to make sure that they keep their folded shapes.
After shaping, proof them at room temperature for 2 hours or until double. Brush the top with another round of egg wash. And bake at 200 degree Celsius for 15 minutes. Glaze the top with sugar icing (recipe above) and desired nut topping (optional).
——————————————–
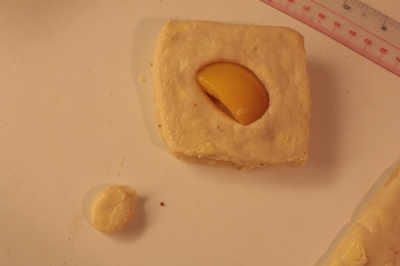
APRICOT PUFF
Place an apricot half in the center of the dough square. Put an apricot on top.
Top it up with another square with a hole at the center to show the fruit.
——————————————–
BUTTERFLY
Make a diagonal cut to 1cm of the center from two opposite corners, forming two triangles that are joined at the center. Place a small teaspoonful of apple filling (recipe above) in the middle of each triangle.
Fold the cut corner over to the other. Press lightly to seal, and then separate the triangles to form a butterfly shape.
——————————————–
COCKS’ COMB or BEAR CLAW
Place a 7.5 cm roll of almond paste (recipe above) across the middle of the square.
Fold the dough in half. Press lightly to seal, then fray the edge by making cuts at ¼ inch (3 mm) intervals. Bend the pastry back slightly so that the cuts spread out.
——————————————–
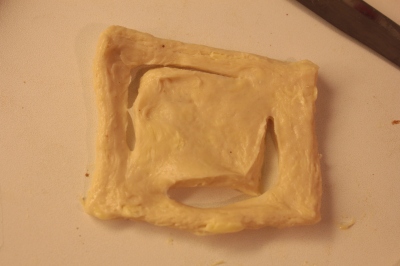
DUCHESS or ENVELOPE
Fold your dough square into a triangle.
Cut a border, 1 cm wide in the square, leaving it intact at two opposite corners.
Open it out.
Fold the cut corners of the border over to the opposite corners of the central square. Fill the center with fruit mince or jams.
——————————————–
FRUIT CUSHION
Place two fruit pieces diagonally on the square.
Fold two opposite corners to the center. Press lightly to secure.
——————————————–
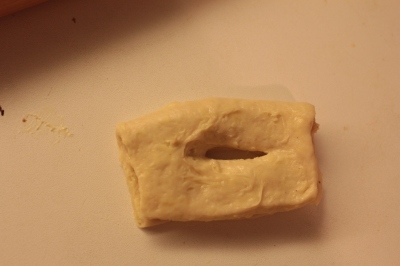
PEACH ROLL
Place a slice of peach on the dough square and roll the dough around it.
With the join-side downwards, cut a slit to reveal the fruit.
——————————————–
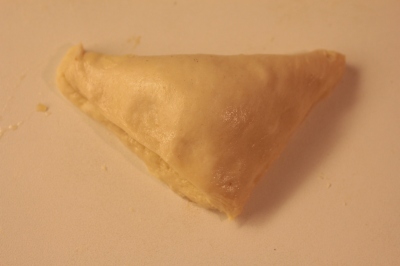
TRIANGLE
Place a generous teaspoonful of Apple Filling (recipe above) in the center of a square.
Fold in half diagonally and press lightly to seal.
——————————————–
DANISH POCKET
Fold 4 corners of a dough square toward the center, press lightly to seal.
Add jams, fruit, or custard at the center.
——————————————–
TWIST
Spread the dough square with Cinnamon Butter (recipe above).
Fold it in half make a lengthwise cut to within ½ inch (1 cm) of the ends.
Pass one end through the slit to twist the pastry.
——————————————–
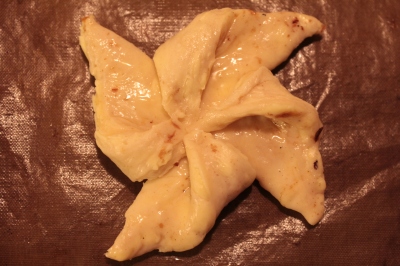
WINDMILL
Make a diagonal cut from each corner of the square to within 1cm from the center.
Fold alternate cut corners to the center.
Fill the center with jams, or cream cheese filling.
——————————————–
CLASSIC SWISS ROLL
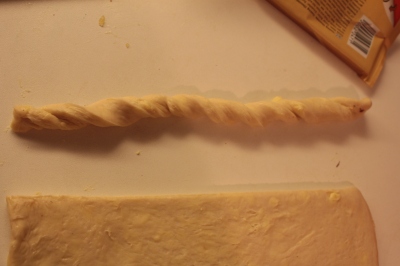
Then cut the dough into roughly 1.5cm thick, stretch it out with your hand until you have a 15cm long strip. Then use the palm of the other hand to roll the strip toward you, to form a twist, like this.
Now, still holding one end of the dough strip down, drape the strip down and around the center point in a curlicue. Bring it around and around and then tuck the last 1 cm underneath so the pastry doesn’t unravel in the oven.
Put some of your favorite jam in the center. And you are done!
——————————————–
SNAIL ROLL
Start by rolling out again your dough into a rectangle, less than a 0.5cm thick, and have one side more than 10cm. If you are making cinnamon Danish rolls like I do, spread out a thin layer of cinnamon butter, then scatter raisins, or chocolate chips or whatever you like – over the sheet.
Gently turn in the top edge, and using both hands roll the whole thing up.
Shore up the ends with your hand and roll the tube back and forth a little to solidify it a bit. The roll should be about 3-4cm in diameter.
Now, using your bench scraper (or a knife) to cut them into roughly 2cm thick pieces.
Now all you need to do is peel back about the last 2cm or so from the roll and tuck it underneath to keep it from unraveling in the oven.
Proof, brush with egg wash and bake just like you would classic sweet rolls. Drizzle with simple icing — or even chocolate — if you wish.
There are chocolate chip snails like Joe Pastry suggested, cinnamon sugar snails, cinnamon sugar and raisin snails like mine, walnut and cinnamon sugar snails, pecan snails, almond filling snails and many more, waiting for you to explore. 🙂
——————————————–
AU PAIN CHOCOLAT
With a sharp chef’s knife, cut the dough into 5x7cm rectangles. Lay each rectangle, long side facing you, and place about 1/2 tbsp. of the chopped chocolate in the upper third of each one.
Fold that third of the dough over the chocolate. Place about another 1/2 tablespoon of the chocolate along one seam of the folded dough.
Fold the bottom third of the dough over the chocolate.
——————————————–
LAMINATED DANISH SANDWICH LOAF
(Reference: TXFarmer)
Roll out dough to 1.5-2cm thick. Length of the dough piece would depend on the tin you use. Since we are braiding them, you will need the length to be about 2X length of the tin.
Cut the dough into three 2cm wide strips. We will do a 3-braiding here.
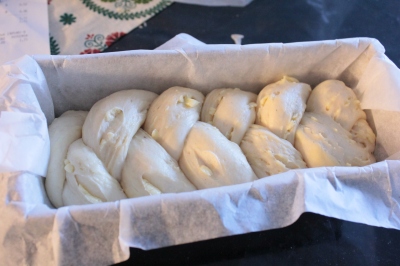
After braiding, put your dough into the prepared pans (lined with parchment paper). Snap a photo, like this.
Then let them proof at room temperature for 2 hours or until double in size. Apply egg wash on top of the loaf.
Now bake it at 200 degree Celsius, for 20 minutes.
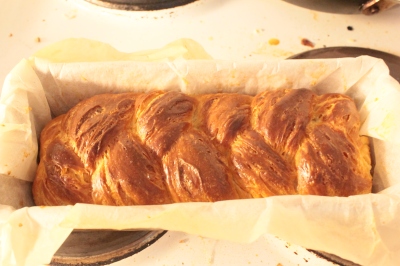
Wait 20 minutes then flip it out of the pan, and there you have it, your laminated sandwich dough. Slide this babe up and serve warm with a spread of strawberry jams, heaven on earth is here. 🙂
——————————————–
Here are my 2 trays of Danish pastries, right after final proofing and before going to the oven. I dare you to tell which shape is which without reading this post again, hehe.
And after baked. Let them cool down a bit, like 20 minutes.
Now drizzle some sugar icing on them, using a fork. Yummy.
Here are one more picture to put an end to this long, ambitious project. YAY!
——————————————–
Today, my friends and I watched the last match of Champion League. The other three supported Chelsea and English football, while I secretly supported Neuer, Bayern’s new goalkeeper. Final result was that Chelsea won its first Champion League. Congrats, Chelsea! God does want you to win this time. Petr Cech was so experienced and focused, he does deserve to be a champion.
This will be a sleepless night in Munich city. My poor Neuer… :((Not poor Bayern, but just Neuer. Bayern team had had many, many chances to win this game, but they missed all of them, one by one.
I wonder to myself – “why do I always love goal keepers?” Oliver Kahn, Van Der Sar, Petr Cech, Buffon, Casillas, and now Neuer. I never like any strikers, or midfielders before, some are very, very famous and charming, like C.Ronaldo, Messi, or Rooney,
But they are not my types, I guess. 😉
Anyhow, great game! I made up my mind that I will support Neuer and the German team in Euro Cup this year. 🙂
Nighty night,
Rose,
Submitted this to Yeastspotting.

















This is a very helpful recipe for my work place thanks and I’m very glad to u keep update with your work …
LikeLike
Pingback: Homemade Vegan Danish Pastries - The Vegan Cookbook Aficionado
OMG, thank you so much for the details on making these pastry. I printed your page and hope to try these soon.
Michael
check out my Rolling Pins
LikeLike
Hi Michael,
I’m glad to be helpful. Please keep me updated with your oven. You craftwork is very beautiful, btw.
Rose,
LikeLike
This is an incredible post!!! So helpful. I am stunned.
LikeLike
Thanks for your kind words, Bella.
LikeLike
Pingback: Croissants and Everything Laminated – How it all began + Lessons and Tips learned – My Croissant Chronicle – Part 2 | Faraway from Home
Pingback: Croissants and Everything Laminated – My Revised Recipe for Beginners – My Croissant Chronicle – Part 1 | Faraway from Home
Pingback: Weekend Brunch Round 21: Homemade Danish Pastries | The Vegan Cookbook Aficionado
Terrific post and very nicely detailed and illustrated. I have a danish pastry that I love and I was looking for some more shaping ideas. Well, you have me covered. Thanks.
LikeLike
Hi Helen,
Glad to help you out and having a new friend to share the danish passion with. 😉 Hope to hear more from your oven.
Rose,
LikeLike
Hi, Rose, thank you for leaving such a detailed description of how to make danish pastry. I live in England (though I come from Estonia) and I’m a passionate baker myself. I am having similar experiences with danish pastry as you’ve been having. My first batch was really dry and not at all flaky. The second one was better and today I baked my 3rd and it looks amazing. However, I think I still have to practice more and find my ideal way of making them. Thank you for posting recipes for so many fillings. I tried a few today and I will definitely try to make that confect. custard – the recipe looks REALLY promising! Here in England I tried my first danish with maple syrup and pecans and it’s HEAVENLY. SO, why don’t you try and make those too ? The recipe that I found is really simple and I used it today, I didn’t add any sugar though, as I didn’t want it to be too sweet…
for about 5-6 pastries you’re going to need
100-120 pecans
6 tbsp maple syrup
3 tbsp sugar
1-2 tbsp cream cheese (Philadelphia)
roast pecans lightly and crush them, leave some aside for topping,
add m. syrup, sugar and cream and mix all into a paste.
I won’t bore you how to twist the dough because you can easily google it.:)
Your blog is super! Keep it up!!!
LikeLike
Hi Elizabeth,
Thank you for your kind words and wonderful sharing. I will definitely try it real soon. 🙂
Hope everything is great in your kitchen and in life. I wish you lots of luck and courage to explore the awesomeness of danish pastries.
from Vietnam with love,
Rose,
LikeLike
Cám ơn bạn rất nhiều. Đây là loại bánh mình yêu thích từ lúc còn bé cho đến nay . bài viết chi tiết để cho mấy người mới tập làm bánh mì như mình có thể biết dc cách làm.
LikeLike
Cám ơn EvillyChic rất rất nhiều. Mình thích bánh này vô cùng nhưng làm hoài vẫn chưa ưng ý. bài viết chi tiết giúp mình hiểu cách làm. Mình sẽ làm bánh này vào cuối tuần. 🙂
LikeLike
Thanks Huyền Vân nhiều nha. Mình tên là Nhung, sinh năm 90 cho dễ xưng hô nhé. 😀
Làm bánh xong cho Nhung biết kết quả với nha, hồi hộp quá!
Nhung,
LikeLike
lovely post…learned a lot about shapes…one question we put the jam after its baked or before baking it…please reply. thanks
LikeLike
Hi Saleha,
Thank you for your kind words. I believe that jam shoud be added before baking. 🙂 I hope you keep me in touch with your will-be-great result. Good luck.
Rose,
LikeLike
I love the Danish best. and a wonderful post it is. love !!
LikeLike
What an incredible post! Beautiful Danishes and so much information. I love your laminated sandwich loaf – I’ve had my eye on that at The Fresh Loaf for a while 🙂
LikeLike
Thank you for your kind words, Korena. I adore your sharp work with Sourdough Danishes in your latest post. Could you share the secret on how to keep the corner square and the shape firm? Thank you so much in advance.
Rose,
LikeLike
Hi Rose, I was careful to trim the edges before folding every time, and my kitchen was fairly chilly when I was working. When shaping the Danishes, I only worked with half the dough at a time (the other half was in the fridge) which meant that I was working faster and it didn’t have time to warm up and soften. I think those are the only “secrets” I have! Does that answer your question?
Cheers,
Korena
LikeLike
Hi Korena, I also think working with smaller amount of dough will help with the cutting and shaping. 🙂 I will definitely try that, thank you so much.
Hope to hear more from your kitchen,
Rose
LikeLike
Pingback: How to shape Danish pastry? | CakeChannel-Blog.com
This is so detailed! I wish I had an oven to try some of these recipes.
LikeLike
Hi Grenouille,
Thank you for your kind words. 🙂 Your blog amaze me, really. I wish I have the understanding of the texture, and the sewing skill and techniques like you have. I would dress myself up everyday!
It’s a pity that you don’t have a oven. But there are recipes in this blog that does not require an oven, like some of my Vietnamese dishes. Please do try them.
Hope to hear more from your kitchen, and your sewing table. 😉
Rose,
LikeLike
Oh, you’re very sweet, Rose! Yes, I’ll have to look around some more at your other recipes! I’m glad you’ve been enjoying my sewing, too. 🙂
LikeLike
Wow! This is really useful.
I wrote a danish post on my blog, but not with so many steps!
Neat.
LikeLike
Hi Ilan,
Thank you for your nice words. Your blog is amazingly informative, too.
Let’s keep in touch to each other kitchen. 🙂
Rose,
LikeLike
Hú hú check mail nhé.
LikeLike
Checked and replied chi iu oi! >D<
LikeLike
Hello, nice blog, thank you for liking my posts.
LikeLike