Baking Diary – Log 14 – 19.10 to 31.10.2012
This post was written on and off from 19.10 to 30.10. Therefore, the story will be quite conflicting between the beginning and the end… Keep up with me please! 🙂
Hi there,
It has been over a week since my last post, apple yogurt cake for a perfect autumn. I have been super busy with packing and cleaning my apartment, prepare for my very-soon moving out of Finland for good. (Well, I know. Never say never, but maybe there will not be a chance for me to come back to Finland, not in a next couple of years.)
Well, let’s go to today’s post main topic. I have been watching the MasterChef Season 3 recently. It all started to attract my attention when I knew that the winner of this season is a Vietnamese blind cook. Yes, you read it right, blind. I mean, she is amazing; I have two pretty good eyes and too often I made messes in my kitchen. 😛
Ever since I watched the episode 19, when Josh and Frank went head to head to get to top 3 over the three soufflé dishes, I was very eager to try that. To tell the truth, I never have a soufflé in my life (poor little Rose), not to mention make one. With the excuse that all my kitchenware and my lovely Ken (full name, Kenwood Prospero :D) have been well packed, I “gently” let myself down a couple of times (maybe 5?) but last night, at about 2PM; I had to play “gold digging” to get my ramekins out of the boxes (under tons of clothes), used the old 5-euro secondhand mixer, very-low-battery kitchen scale with its ridiculously large bowl, and a very suspicious set of measuring cups to make this dish: Traditional Vanilla Soufflé.
Luckily, as seen in the picture, they (Hey Rose, common! As if your readers did not notice those in the back 😛 Oops, my bad.) most of them turned out great. They grew as high as well, a normal soufflé I saw in most picture. 🙂 YAY! Every spoon of these babes is as light and fluffy as a little warm cloud of vanilla. So, if I can create these little heaven-in-a-cup right in the first try, you can too. Just pay carefully attention to the demonstration below, as in this dish, the technique is fatally important. The keys of making the dreamy soufflé are the silky custard and the perfectly stiff (however, not dry) meringue. Let see how was my first encounter on the journey to the perfect vanilla soufflé.
Soufflé – Take 1. Action! 🙂
———————————————-
Ingredients (for 4 small-sized ramekins of 7cm diameter, 5cm high)
(Adapted with some personal changes from Cooking Channel)
For coating the ramekins
- 1 tbsp. of soft butter
- More or less of ¼ cup of caster sugar or grated chocolate (Keep the grated chocolate in the fridge before use)
Custard/Pastry Cream
- 2 egg yolks
- 1/8 cup = 28g caster sugar
- 1 tbsp. + ½ tsp. cornstarch
- ½ cup +1 tbsp. of milk
- ½ tsp. vanilla extract
Meringue
- 2 egg whites
- A dash of lemon juice or a pinch of salt
- 1/6 cup = 38g caster sugar
———————————————-
Demonstration
Preheat the oven to 190 degree Celsius.
Making the Custard/Pastry Cream
Step 1: heat ½ cup milk in a small saucepan on medium heat, and stir frequently.
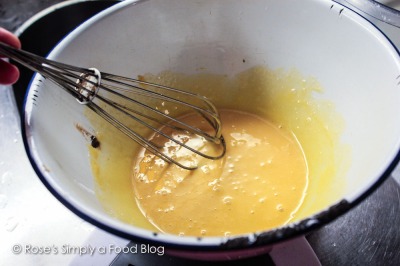
Step 2: Mix egg yolks and sugar.
Whisk vigorously until the color is light yellow and the mixture is thicker.
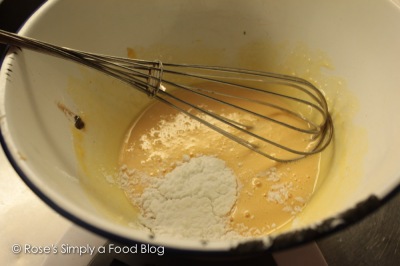
Step 3: Add cornstarch together with about 1 tbsp. of milk.
Mix to obtain a mixture like below.
Step 4: Now that the milk starting to boil, use a small ladle to pour spoonful of hot milk, one at a time, into the yolk mixture (this step is call tempering the egg mix).
Step 5: Now that half of the hot milk has been used to temper the egg mix, reduce the heat to low, pour back the tempered egg mix into the saucepan with the other half of milk.
Stir constantly until achieving thick, smooth custard like below.
If there are some lumps, don’t worry; simply strain the mixture over a fine sieve. 🙂
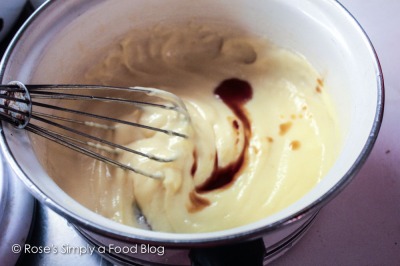
Step 6: Now let the mixture bowl rest in a bath of ice-cold water to prevent it from further cooking. When it cooled down to almost room temperature, stir in the vanilla extract.
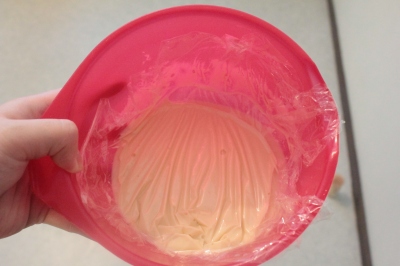
Step 7: Use a plastic wrap to cover the custard, let it lay on the surface to prevent the skin to form on top.
Ideally, this custard needs to rest in the fridge for at least 2 hours before use. But you know me, I am too impatient to wait for 2 hours, therefore, I let it rest for only 30 minutes… 😛 Bad, bad Rose!
Coating the ramekins
Step 1: Use a pastry brush to apply soft butter inside of the ramekins. Be generous! 🙂 You should first brush the bottom of the ramekins, and then start from the bottom, give small strokes towards the top edge of the tins, to promote the raise of meringue, like this. (Well, pardon my sloppiness… I made these babes without much preparation; therefore, I use my warm fingers to soften the butter. You, however, shouldn’t follow this lazy gal’s example, OK? :D)
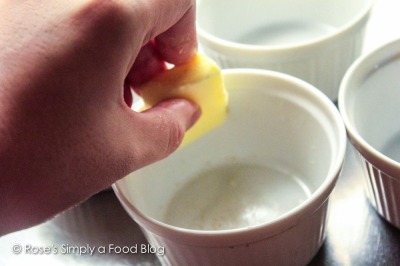
Step 2: Fill half of one ramekin with granulated white sugar or grated chocolate. Now, tilt the ramekin to about 45 degree, hold and twist to coat the side evenly with coating material, like shown in the picture below.
Step 3: Now tap the bottom of the ramekin to get all the excess sugar/chocolate out of it, into another ramekins. Repeat the same process until you finish with all the tins.
Step 4: Give these babes a good 15 minutes rest in the fridge to harden the butter.
Making the meringue
I have explained quite clearly how I beat my egg white here in this post about Basic Swiss Roll. Therefore, here, I will just summarize the process. If you have any question or trouble, please first refer to that previous post first, and then ask me if it did not satisfy your cases. 🙂
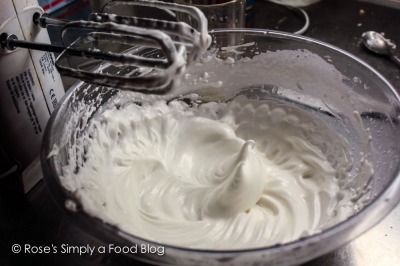
In this recipe, the egg white must be beaten until stiff peak, but not overbeaten to dry stage. First separated egg whites, add cream of tartar or lemon/salt mix. Beat them by a handheld or a stand mixer with whisk attachment at medium speed until foam. Then add sugar in, one tbsp. at a time on low speed to avoid splashing. Continue to beat at high speed for 10 more minutes until you see the meringues reach the final stage – stiff peak, where the meringue will hold almost any shape. It will form sharp, distinct points in the bowl, and it is quite stiff and glossy. It should feel smooth and silky, with no sugar grains. Like this.
It amazed me how technology can tremendously reduce human workload when I have to beat my egg white using my old secondhand hand mixer, it takes me almost 20 minutes to reach the ideal stage. FYI, my dear Ken (what I call my Kenwood Prospero kitchen machine) has been packed to ship home. 😛
Folding the meringue into the custard
The folding technique has also been explained in the Swiss Roll post. Summarize as here.
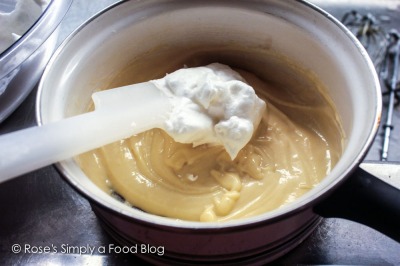
First, scoop 1/3 of the meringue in to the yolk mix. You don’t need to be gentle at this stage, just give them some stir to combine and loosen the yolk mixture. Hold the yolk-mixture-containing bowl over the white mixing bowl tilt it so that the yolk batter slide out into the meringue.
Now add the rest of the meringue.
Simply follow this process: 1) Using a large spatula cut a path down the middle of the mixture with the edge of the spatula. 2) Then gently turn half the mixture over onto the other half. 3) Continue cutting down the middle and turning a portion over.
After this step, you will have a batter like this: thick, not very liquidly, light and airy. 🙂
Again, if there is any problems or questions, please read the previous post first. If it doesn’t help, I am more than willing to assist in the comment section.
Into the ramekins and baking
Step 1: Now that the batter is ready. Remove the chilled ramekins from the fridge; use a ladle to fill half of the cups with finished batter. Remember; first only fill HALF of the cup. 🙂
Now tap the ramekins bottom against the kitchen counter to break any big bubbles and fill the air pocket corners, if there is any, with batter. This will make sure the soufflé will rise evenly and beautifully in the oven later. (And also some stress relief, BAM! BAM! BAM! Just kidding. :D) Lay some towels on top of the counter to prevent loud noises.
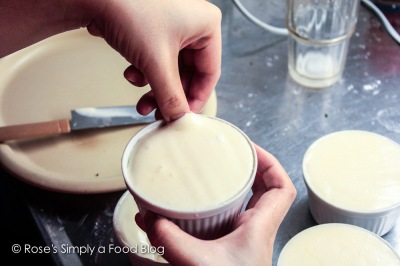
Step 2: following Chef Gordon’s demonstration in this video here, I continue to fill up the ramekins to the top. Then use a knife to remove any excess batter out of the ramekins, like this.
Continue with the rest of the ramekins.
Step 3: Now, run a thumb around the inner edge of the ramekins, like shown in this picture to form a little space between the edge of the tins and the batter inside. This will help the ramekin to rise upward instead of spreading out of the tins when baked.
After this step, you will have these.
Step 4: now arrange the ramekins inside of the preheated oven, try to be as fast as possible to maintain the heat.
Bake them for approximately 15minutes.
Here are my very first vanilla soufflé, just out of the oven. Now dust the top with sugar powder and enjoy them while still warm and high. 🙂
Uhm, full of flavors and lightness…
———————————————-
Problem that I have encountered in the first take and what I think caused it
In this first take; two out of 4 soufflé had quite serious issues with batter oozing out the ramekins while being baked. I noticed that these 2 also had uneven rise; part of the outer edge of these soufflé still stick to the ramekin’s inner edge, causing the weakness in the other side, where the batter start oozing out when further baking.
I suspect that there are five reasons for this problem:
1) Uneven temperature inside the oven? My oven is quite old already, therefore, the space near the door is not as not as the inside, causing the uneven rise. Furthermore, it is also a small oven, therefore, the ramekin positions inside are scattered around, if you know what I mean… 😛
2) Too filled-up soufflé? Some recipes from other sources suggest that the ramekins should only be filled to ¾ of its capacity. I do believe in Chef Gordon. Anyhow, just note this down to experiment in the future. 🙂
3) Thumb run to shallowly, not enough space in between? Maybe when I run my thumb around the inner edge of the ramekins, I did not run it deeply enough, causing the oozing out the batter.
4) Not-clean-enough ramekins’ edges? Causing the uneven rise of the soufflé (1/2 of the edge still stick to the ramekins after baked). 😦
5) Over baked? Chef Gordon baked his soufflé for only 10 minutes in 190 degree Celsius. I baked for 15 minutes because I did not see mine rise high enough like his in the video… 😛 Might this cause my problems.
I have not yet solved this particular trouble in making soufflé; therefore, please, please help me if you have any experience and knowledge with this dish. 🙂 Or if you have time, kindly try and test this recipe in your kitchen to see if it was because of the recipe + techniques I used that caused these flaws. They will be very much appreciated. Thank you so much in advance!
Not giving up yet, not in my dictionary. 🙂 At the very least, I already got 1/3 of them right this time.
I will catch you, the perfect Soufflé!
OK, those are almost it for today, I am having brain freeze again… 🙂
See you in another post,
The first Good morning from Vietnam,
Rose,










Umm,yours were made perfect as if an expert had made em,mine didnt look anything like that,A.m.o.f. they looked horribble! 😦
LikeLike
Hi Jessica, so sorry to hear that yours hasn’t come out right. But I think in baking, practice does make perfect. 🙂 keep the spirit up!
LikeLike
The souffle looks so good! I can almost smell the vanilla.
I’m sorry for all the goodbyes. I’ve moved many times in my life; I know how hard it can be! Glad to hear you are settling in ok and I hope you will get an oven soon! If I can’t bake, I at least want to see all the beauties you come up with! 😀
LikeLike
Souffles are one of my favorite desserts. I’ve never had a vanilla one but I know I’d love it. They look so fluffy and light.
LikeLike
Hi Laura,
It is my new favorite, too. This vanilla souffle so light and fluffy, yet full of flavor. I hope you try this recipe sometimes and let me know how it comes. 🙂
Let’s keep in touch,
Rose,
LikeLike
They look good to me..ive never made any souffles..so yes..they look good to me n im sure they taste good too.
LikeLike
Thank you for being so kind to me, Marie-Louise. 🙂 I hope you try this recipe and let me know how it turns out in your oven. 😉
Rose,
LikeLike
A lovely souffle! Looks delicious. 🙂
LikeLike
Thank you for your kind words, Sara. 🙂
LikeLike
So lucky to have tried many of those beautiful Souffle, they are soft, sweet and melted in my mouth 🙂 Keep it up darling, I’m already panic to try many new cakes that’ll come from your baking courses 🙂
LikeLike
Thank you, honey. :*
LikeLike
I can’t wait to hear about the baking course! That sounds like so much fun. And I can’t believe you made these delicious-looking soufflés without tasting them! I’ve never made them either but now that I’ve read all about it, I think I should 😉
LikeLike
Hi Korena,
Thank you for always reading so diligently and patiently. 🙂 I am very much appreciated it. It was a pity that I could not taste these babes, but it was for the best (my hopefully fit body) so, I will try my best for now. 😉
I do hope you try this recipe. Cannot wait to hear more from your kitchen.
Rose,
LikeLike