Baking Diary – Log 21 – 01.03.2014
OK, after a long, long post like the last, I want to go really light this time.
So, Rose, what’s for today? 🙂
It gonna be nothing new, just creating and testing a new recipe, learning a few unexpected lessons, and as usual, torturing my dear readers with my unchanged lengthy writing: My 100% Whole Wheat Bread with Tangzhong and Semi-Autolyse Method. I was very lazy with this recipe as I took most of the demonstrating photos by cellphone. 😛
I have spent loads of time and effort writing 2 posts about the Tangzhong Method that you can refer to here, part 1 (Introducing about tangzhong and my Universal Tangzhong converting formula) and part 2 (Where I shared how to adapt the formula and my 2 mostly used tangzhong bread recipes).
Today, I just have my fun and adapt (a little heavier than) slight change to my normal whole-wheat recipe, turning it from 50% whole wheat to 100% whole wheat. “And you said that was slight?” – you panicked. I did said “a little heavier than” right? 😉 Don’t worry, I have crack the code to make it super easy to be adapted and super tasty as well.

OK, here comes the fun part.
Recipe:
1 Pullman loaf of 20x10x10cm
Difficulty level: Easy
Tangzhong
- 20g whole-wheat bread flour
- 100g water
Final Dough
- All of the tangzhong above
- 330g whole-wheat flour
- 130g lukewarm water
- 5g dry yeast (or 10g fresh yeast)
- 50g honey
- 5g salt
Demonstration:
Step 1: Prepare the tangzhong according to my instruction here. Summary, dissolve flour in water, cook it until 65 degree C or simply put, into custard-like texture. Let cool to room temperature before proceeding with next step.

Step 2: While cooling the tangzhong, activate the yeast according to the manufacturer; mine needs dissolving into lukewarm water. When the tangzhong is cool enough and the yeast is activated, dump everything in the dough recipe above into a big mixing bowl, yes I mean everything, but make sure that you bury your salt or keep it far away from the yeast water mixture, otherwise, you might risk killing our precious bacteria.

Step 3: mixing it till formed a well-hydrated mass. Like this. See how little the gluten developed?

Then do nothing, absolutely nothing, let it be for 1 hour. Hey, did I say peeking is also not allowed? Do something else, like reading a new book, shopping, eating, hanging out with friends, whatever, just LET IT BE.
Oh, wait; you can do one step as below.
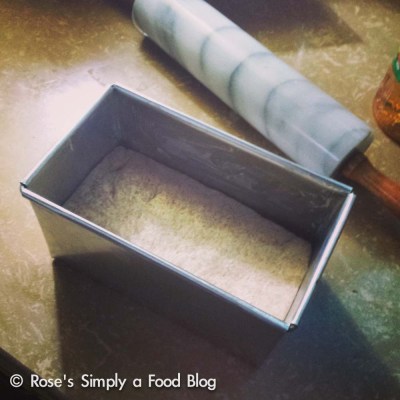
Step 4: Grease 1 Pullman loaf of 20x10x10cm with butter or cooking oil, remember to grease the top as well. Done? Now continue with the wait.
Step 5: After 1 hour, the mass looks puffy in size (almost double). The saggy whole-wheat bits and pieces just come together. It is the magic of Autolyse – letting the gluten in the dough develop by itself through time.

And now it’s kneading time. Now knead the dough for 6-10 minutes until its gluten fully develop like this.
Step 6: Now the dough is ready. It’s shaping time. Hey Rose, did you forget anything? Where is the bulk fermentation? Hey, you just did it, together with the Autolysis. 1 full hour of waiting, remember that pain? 🙂

Now rolling into thin sheet, then into a thick torpedo. Then do it again, like me demonstration in this Pullman white bread recipe.
Step 7: Let the dough rise for another hour until it’s only about 2cm away from the top. Like below.

Step 8: About 10 minutes before the final fermentation is over, preheat the oven to 195 degree C.
Step 9: Cover the loaf with its top, and then bake it in preheated oven for 1 hour. When it’s done, get it out of the pan, and let cool completely for 30 minutes.

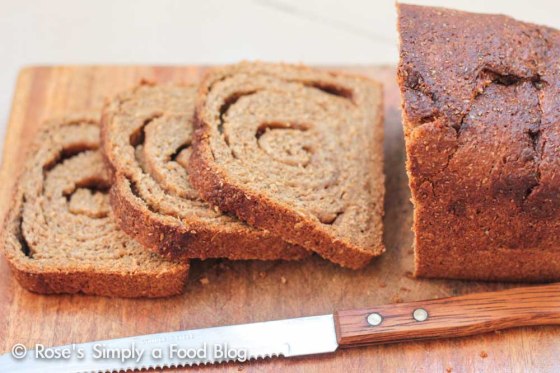
Step 10: Slice it real nice, and enjoy all the good and healthiness of whole wheat, while it still very fluffy thanks to the added tangzhong and Autolysis.

————————————-
OK, now that you have had your wonderful loaf of bread. Let me explain why I insist on letting the dough be in Step 3 of the demonstration. Let me explain to you the concept of autolysis. This wonderful blogger at A Bread A Day has explained this term very well.
Etymologically speaking, it’s the French word for the biological term “autolysis”, which is from the Greek words meaning “self” and “splitting”. Autolysis refers to the destruction of a cell by its own enzymes. In baking, this means that enzymes in flour (amylase and protease) begin to break down the starch and protein in the flour. The starch gets converted to sugar, and the protein gets reformed as gluten.
When we knead the dough, we are trying to do the same thing – form gluten. But accidentally at the same time when we knead, we also oxidize it (expose it to oxygen). Over-oxidized (or, over-kneaded) dough results in pale and tasteless finished bread. By giving the mixed flour and water time to go through autolysis on their own, you achieve the same result, but without any of the unpleasant effects of oxidation. Additionally, an autolyse period gives the flour time to soak up all the moisture, resulting in more orderly gluten formation.
Long story short, autolysis will make your dough easier to handle before it’s baked, and the end product will taste better, have better texture, look better, and have better keeping qualities.

It’s not yet the best part! Think about it, what you have to do for to make this happen? Absolutely NOTHING! You just need to wait for the miracle to work its own magic, in its own timing. Some (especially those who are hot-headed like me), might complain that waiting make them anxious and drive them crazy, they cannot help but poking and touching and peeking to the dough. I did all that, and worse. I turned my poor Ken (Kenwood mixer, read review here) to max only to see its hook move hopelessly in the bowl, gathering no dough. I turned the dough on to the counter, and started hand-kneading it (a.k.a. slapping, torturing it around, and slamming it against the marble countertop with pure anger), only to feel it stickiness on my hands and onto my hair. It was frustrated. I tried all I know, I tried so hard. Why? I almost throw it to the trash. But at one point, I just gave up, stopped struggling, and let it be for the whole hour. And guess what, this post happened.
Through all of those fail attempts, I’ve learned my lesson, that sometimes in baking (and in life in general), all you can do is just breath, have a little faith in what’s meant to happen, let go and let Life be. It’s not going to be easy (it’s going to be really hard, in fact, for me) but it is going to be worth it!
Haha, I don’t know what I am talking about right now, anyway, back to baking.
————————————-
I (and some of you) might know that ideally, autolyse involves mixing only the flour and water together. But in this recipe, I’ve instructed you to add the yeast, the salt as well (which basically everything), Why? Let me explain first on yeast and then I go to salt, OK?
By mixing the yeast into the flour and water, you avoid any accidental yeast extermination that might occur when adding tiny dried yeast particles at the same time to a big ol’ lump of dough, post-autolyse. Besides, this way, the yeast can start to activate and produce all those lovely little acetic and lactic acids that also help make your bread better. Best of best, it also helps you reduce the bread making time as the yeast also fermented the dough while it autolyses. If you prefer reading more technically about this matter, I am more than happy to refer you over to Northwest Sourdough Autolyse Experiments One (the effect of Autolysis) and Two (the effect of adding levain/yeast before and after Autolysis).
OK, Yeast I understand, but salt, is it not only a protease inhibitor (tightening the gluten); it’s also a yeast inhibitor (killing it)? Why you add salt in? Let me tell you honestly, it was pure laziness at first. The first time I use autolysing technique; I strictly followed the Flour-Water only Golden rule, the result was superb. So I read more, and stumbled upon posts above at Northwest Sourdough, so I start adding yeast to my autolysing mass. The problem with salt and autolysed dough is, sometimes, salt cannot be incorporated evenly in the dough, causing uneven bread taste. It was weird, one side of bread, it was way too salty, the other side, tasteless. 😛 So, I got lazy, and I dumb all of them into the bowl at once. It was reckless of me, but the result, at least from my bare eyes and tongue. And I keep doing it from then on. End of story!
Thinking of a name for this method because Autolysis + Pre-fermentation seems long. How about Prefutolysis? =)) Haha, big weird-NO! OK, just keep it as it is: Semi- Autolyse.
————————————-
Furthermore… “What, Rose, more? Did you say you gonna keep it light this time?”
OK, one last thing before I am out of here. Last thing I promised. I also try this with mixture of half Whole-Wheat – half Rye with great success. Here, see?
Recipe as follow:
- All of the whole wheat tangzhong above
- 150g rye flour
- 180g whole-wheat flour
- 130g lukewarm water
- 5g dry yeast (or 10g fresh yeast)
- 50g honey
- 5g salt
All the steps are the same as above, the result is the softest rye bread I’ve ever tasted.

Another shot at its awesomeness.

Compare between the two beauties.
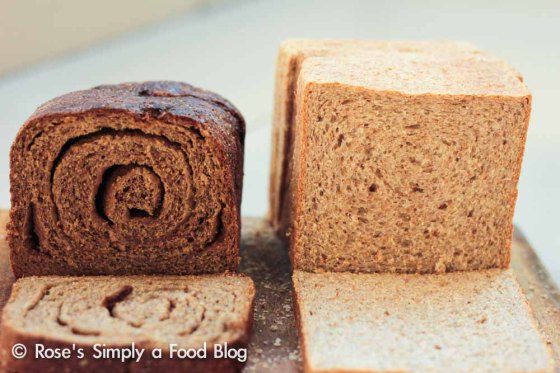
You can see that from the same amount of flour, rye bread always have less rise and denser texture. Don’t worry, it’s normal.

OK, as promised, I stop here, now, immediately. 😉
Until next time,
Rose,
P/s: I submitted this to YeastSpotting.

Hi Rose,
I was just wondering if the 330 g of whole wheat flour is supposed to be whole wheat bread flour? I used whole wheat flour for the dough and whole wheat bread flour for the Tangzhong, and it took longer than 6-10 min of kneading to develop enough gluten. (Or maybe that’s because I kneaded it by hand?)
Do you think using whole wheat bread flour for the whole loaf would help ?
Thank you!
LikeLike
Hi S.S, if it’s available to you, WW bread flour can really help with gluten development. If you knead by hands, yes, unfortunately it would take at least 15-20 mins to achieve same results as kitchen machine. But I always count it as good exercise for the arms.
Hope it helps,
Rose.
LikeLike
Hello Rose,
My name is Paulo, I am from Brazil. I really enjoyed your 100% whole wheat bread recipe. I’ve been using the tangzhong method for a long time, but I’ve never been able to make my whole-wheat bread fluffy like the ones made with white flour.
I want to try your recipe, but I was left with a doubt, won’t any kind of fat in the dough? If I do not use honey in the recipe will affect the end result.
Thank you for your attention and look forward to your reply.
Thanks.
LikeLike
Hi Paulo, apologies for the late reply. 🙂
Based on my own experience, to work more easily with WWF, try autolysing, to be even safer, try it with just the flour and water (no yeast, no salt, no fat/sugar) for 1-2h bf mixing all together, it’s the method I describe in the post. With this method, the dough is more water absorbent and hence softer w/o fat. For extra fluffiness u can add up to 40g of room-temp soft butter into this recipe w/o any resistance from the dough for sure.
W/o the honey you might want to increase the water/fat % bc honey is liquid.
Hope this answer your question and keep me updated w/the result!
Rose.
LikeLike
Hi,
is your oven convection or not? As I guess the baking time and/or temperature may differ. thank you
LikeLike
Hi Yosephine, it’s a conventional oven so I don’t really know the difference…
LikeLike
Hi Rose, thanks a lot for your wonderful detailed write up.I baked the bread today.it was tasty and little denser.i have few doubts.could you please help me.
1. After step 3, my dough was not as hydrated as yours.So I added 40 ml more luke warm water to make the dough.why so.
2.In which rack should I bake the bread.Bottom rack or middle rack.
3.Should I use both the heating elements (top and bottom) or I should use only bottom heating element.
4.Also tips on slicing the bread please.
LikeLike
I used Indian whole wheat flour instead of whole wheat BREAD flour.will that be the need for more water content?
LikeLike
Hi Rose, please answer.I use Indian whole wheat flour.
LikeLike
Hello Rose
Any substitute for honey.
LikeLike
Hi Paayel, check this out! https://ohmyveggies.com/substitutes-for-honey/
Hope it helps! – Rose.
LikeLike
Hi Rose, is it possible to apply this method to other bread recipe? Tks
Mel
LikeLike
Hi Vanitha,
Apologies for the super late reply. pls see my answer below:
1) dough hydration is not an exact science, especially at home baking level since every bag of flour in supermarkets (not to mention brands, type of flours) behaves differently. If you feel the dough is too dry, add a bit more water; if too wet, a bit flour.
2) I usually bake at 3/4 rack from top down.
3) yes.
4) let cool completely and the use serrated knife for slicing.
Hope it answers your questions. 🙂
Rose.
LikeLike
Thank you Rose for sharing your 100% wheat flour bread recipe. I followed with just a slight change to make buns and they turned out so well. I also learnt the tangzhong method by following your instructions.
LikeLike
Hi Mayuri, I’m glad to be helpful. ^^
LikeLike
Hello!
I was wondering if I could replace the water with milk for a softer loaf. Or do you think this could impact the autolysis?
Thank you!
Gaby
LikeLike
Hi Gaby,
I won’t recommend using milk instead of water because while milk enhances the flavor, the more fat % in the milk might mess with the overall recipe.
Of course, you can always experiment and I’m more than thrilled to hear about results.
Hope it help,
Rose.
LikeLike
Thank you, Rose!
I have tried this recipe today, but unfortunately the bread did not rise much, and baked a bit more dense than expected. It tasted delicious, though!
The initial measurement of water yielded a very dry crumbly mixture (I live in a very dry climate), so I added 40ml more and let it sit. I believe it was a mix of weak yeast and flour. I don’t think it was the salt, because I only added that while kneading. I will try it again tomorrow, perhaps will double the yeast and knead longer, this time using the mixer (I kneaded by hand the previous time).
Unfortunately where I live we only have access to this one brand of whole wheat flour and the same for the yeast, so I can’t change anything there.
Lastly, do you think it would have risen more if I had baked it in a Pullman loaf (I did not have one, so I baked it in a open tin)?
Thanks again!
Gaby
LikeLike
Hi Gaby,
Have you tried activating the yeast before mixing the dough, to check the viability of the yeast? I suggest you try diluting them in 20-30ml of warm water/liquid (then remember to subtract that amount in the dough), leave for 5 mins, if the yeast mix is bubbling & foaming up nicely, it’s good to go.
I don’t think the type of tin would affect the rising level. In fact, Pullman tin is to limit the rising level of the bread only to fit the size of the tin.
Let me know if this help,
Rose.
LikeLike
Thank you again for your reply! Today I attempted it once more time. I started by testing the yeast and found it performed as expected (foam and all).
This time around I did not have to use extra water. Turns out I was cooking the tangzhong too long and dehydrating it too much. Today I cooked it exactly to 65C and the dough seemed hydrated enough.
The main problem this time around was that it still did not rise enough. It rose in the pan, but not at all in the oven. I tried developing the gluten but after kneading for almost 20 minutes the dough just kept getting more and more sticky. I think the problem is that I’m using plain whole wheat, and not bread whole wheat. It did not come close to passing the window pane test.
My loaf tastes awesome, but it is no where near having that beautiful texture of yours! I will try to buy bread flour online and see what happens.
I wish I could post a photo for you to see the end result!
Cheers and thanks again,
Gaby
LikeLike
wonderful. This is my university i had been searching. I a about to start bakery in Africa. Thank very much .that only what we need.”knoledge”
LikeLike
Can I make the tangzhong with white bread flour, and also mix white and wholemeal for the recipe?
LikeLike
Hi Lesley,
Of course you can apply tangzhong method in almost any bread recipes you usually use. Have a look at my converting formula here: https://simplyafoodblog.wordpress.com/2012/11/05/revealing-the-ultimate-secret-to-softer-fluffier-bread-that-stays-fresh-for-days-part-1-my-universal-tangzhong-converting-formula/
Hope it helps and keep me updated yes?
Rose.
LikeLike
how long should I need it if it is by hand? I don’t think I needed it enough because my loaf didn’t rise as much as yours!
LikeLike
Hi Carmen,
It is hard to give an exact time, because I don’t know your kneading technique and all. But my thumb rule is to look at the dough itself, use the gluten window test, as well as looking at the dough surface, it should be baby skin smooth and elastic. You can refer here for images: https://simplyafoodblog.wordpress.com/2012/05/07/sunday-light-baking-and-my-favorite-daily-soft-white-bread-recipe/
Hope this helps,
Rose.
LikeLike
Thanks rose!
Do you think I can add egg? If I do which step should I add it in?
LikeLike
Hi Carmen, you r welcome. And for this specific recipe, I wouldn’t add extra egg or else it will mess up all the ratio. The bread is very nice on its own, give it a try.
If u insist on adding egg, I suggest u could search for other recipe such as Brioche, which contains plenty. 🙂
Hope it helps,
Rose.
LikeLike
In your ingredient list for the whole wheat tangzhong, you say 20g whole wheat bread. You probably meant to say whole wheat flour or even whole wheat bread flour.
I’ll try this next time I make dough. I’m autolysing for this batch, but will try cooking next time!
LikeLike
Hi Karen,
Yes, you are right, Whole wheat flour. Typo fixed. 🙂 Thank you for your kind observation and reminder.
Hope to hear from you soon,
Rose.
LikeLike
hi..rose,
in which step if i want to add butter?thank you
LikeLike
Hi Susy,
If you want to add butter, add it after step 5 – kneading. So it means that after you mix the dough to sufficient gluten development, add butter and mix some more till all incorporated.
Hope it helps,
Rose.
LikeLike
thanks rose..
LikeLike
The first time I made this recipe, it was a success and the bread was so, so lovely! But when I tried to make it again last week, the dough was super tough, sticky and barely passed the window pane test (even after 20 mins of kneading by machine!) and the end result was a bread loaf that is dense and dry do you have any idea what went wrong? Thanks dear 🙂 I greatly appreciate your help!!
LikeLike
Hi Ling,
Sorry to hear about your accident… I encountered that before, and turn out, as surprising as it sound, I used the wrong kind of flour (pastry flour instead of bread flour in my case). Mistakes in the kitchen could happen so I suggest you could check again the type of flour, then the yeast quality, and let me know if this incident repeats.
Let me know if further problems present,
Rose.
LikeLike
Hi Rose,
For step 3 where you need to leave the dough for an hour, do I need to leave it longer if my dough does not double by one hour?
Thanks!
LikeLike
Hi there,
If the dough doesn’t double by one hour, you can extend the time until it does. 🙂 Just make sure that you activate the yeast correctly, cover and put the dough bowl in warm area.
Good luck and let me know the result,
Rose.
LikeLike
Hi Rose,
Thanks for your reply! I tried this out today. It turned out ok but one thing though, when I was proofing the bread it rose up to 2cm from the top, but after it was baked the bread sunk a bit though. Any idea why this happened?
Thanks again!
Li Lian
LikeLike
Hi Li Lian,
I have encountered this problem before, I think. I suspected that the bread has not been well baked, e.g. unstable structure. Have you tried baking it 5-10 mins longer? If the top browns too much, cover it with aluminum foil. 🙂
Hope it helps,
Rose.
LikeLike
Hi. I just bought a kenwood prospero mixer km 283 yesterday. I was wondering if you made your dough using your ” ken ” ? Thank you.
LikeLike
Hi Shoba, yes, I has been making my dough using my lovely and faithful Ken ever since I have him. 🙂
LikeLike