So this it it, the 50th blog post of Simply A Food Blog by Rose. Yay!
With my unstable performance, annoying appear-disappear-reappear habit, and a extremely-resistant mind, I once thought that we never reached this mark. But like any man with a cause, I strive to move forward, pushing myself through all the “Can’t do” barriers of my own. So, here I am, proud and all, sharing with my dear friends and readers another favorite cooking recipe of mine: Omurice – Japanese Fried Rice Wrapped in Egg.

What is Omurice? It is a Western-influenced style Japanese Dish that is fairly easy to make (It just fried rice with egg wrap, people!) but sure is very yummy.
 So, excited yet? Me too.
Recipe
(serves 2-4 people)
(Adapted from Cooking With Dog, it is my favorite source to Japanese home cooked meals. Very cool video channel, indeed. If you have time, check it out.)
Rice
- 150g Chicken/Pork/Ham/Beef
- 50g Button Mushrooms
- 50g Frozen Green Peas
- 50g corn
- (You can totally add other vegetable such as sweet pepper, celery, etc. or use a frozen vegie mix which can comfortably be found in the frozen section of any supermarket. My personal favorite is fresh homemade and low-carb Kimchi, to turn it into real Asian-fusioned bliss.)
- 2 Garlic Cloves
- 70g Onion (About ¼)
- 200g Canned/Fresh Tomato
- 1 tbsp Tomato Ketchup
- Olive Oil, Salt & Pepper,Sugar
- 1 Bay Leaf
- 300g Rice, Cooked with Less Water (This is the rice amount needed after cooked, so it is equally to about 200g of uncooked rice.)
Fried Egg Wrap
- 4 Eggs
- 2 tbsp. Dairy Cream/milk
- Olive Oil, Salt & Pepper, Sugar
Complement salad
- Greens salad mix of your choice, parsley for garnishing
My Summer Cabbage Salad with Mustard dressing
- 150g shredded summer cabbage
- 1 tbsp. yellow mustard
- 1 tbsp. mayonnaise
- ½ tsp. apple vinegar
Extra toppings
- Tomato Ketchup
- Mayonnaise
Demonstration
To make the Summer Cabbage Salad
Step 1: Shred the cabbage.
 Step 2: Mix all ingredients together.
Set aside till serving time.
 To make the Omurice
Step 1: Chop all the vegetable and meat ingredients. I cubed the meat to 1cm cubes… and marinate it with a little salt and pepper.

Slice the mushroom to 0.5cm thickness.
 Finely chopped the sweet pepper and celery. And slice the kimchi into 1cm strips.
Step 2: Saute the mushroom with about ½ tbsp. olive oil. Remember Julia from Julie & Julia advice? Never crowd the mushroom, otherwise they won’t brown evenly, or not at all.
 After browned, put it on a clean plate.
Step 3: Stir fry the onion and garlic with a little oil until aromatic.

Add the chopped meat of your choice, lightly season with salt and pepper and cook for 5 minutes. Then set aside.

Step 4: Add all other vegetable in, including the sauted mushroom. Lightly season with salt and stir well for 3-5 minutes.

Step 5: Add canned tomato and ketchup into the pan. If you use fresh tomato, you have to go one extra step to make them into sauce, but the flavor is much better than canned.

Add the bay leaf and cook on medium heat until the sauce is half-reduced.

Like this.

This is time to season the sauce to your taste. I prefer mine with salt, little sugar, pepper and some fish sauce (yes, I am a proud Vietnamese), you also can use ketchup, oyster sauce. If you add kimchi, you will have be careful and reduce the salt or other seasoning ingredients because the kimchi already has quite some flavor in it already.
Step 6: Pour the sauce into pan of cooked rice and mix everything together, season again.

After that, you have this. Fight the temptation to serve it right at this step, I know they are good, but they can be even better wrapped in egg.

Omurice Presentation 1 – Traditional
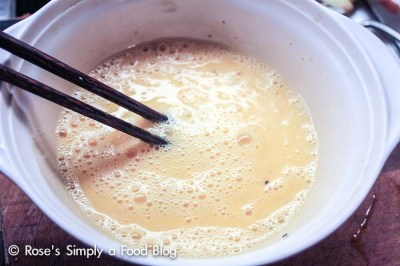
Step 7: Whisk gently but carefully the eggs with cream/milk and some pinches of salt (be stingy on this one).

Strain the egg mixture once to get a nicer color and smoother texture.
Step 8: Preheat an 8-inch nonstick pan on medium-high. Drizzle a little bit of cooking oil in the pan and gently wipe the exceeded off the surface with a paper towel. Reduce to medium-low. This helps the egg keep its beautiful light yellow color. Pour the ¼ egg mixture and cook it for about 3 minutes, or until the surface of the egg is half-cooked.

Step 9:Put ¼ serving of fried rice in the center of the flat egg. Spread the rice evenly down the center.

Step 10: When the egg is ⅔ cooked, the edge of the egg will become like very thin paper and start to come off the pan.Fold up each side of the egg to cover the rice. Leave it that way for 1-2 more minutes to finish cooking the egg.

Step 11: Put a clean plate over the pan, like this.

And reverse the system to have the omurice onto the plate.
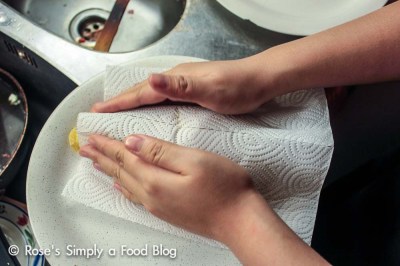
Step 12: To obtain that dreamy ellipse shape that we all see and love on Japanese anime and manga, gently shape it using a clean kitchen towel/paper. This also help absorb extra oil from the egg wrap.
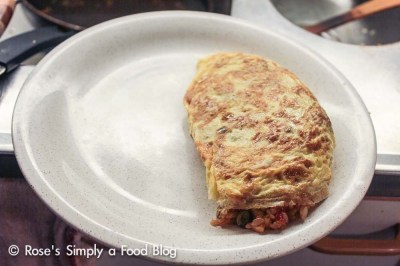
Tada, see, so pretty. Move the finished omelet rice onto a serving plate.
 Step 13: Serve warm with side salad and mayonnaise/ketchup dressing.
  The fun thing about omurice is drawing decorations or writing things with the ketchup.Some common things written on omurice in Japan (Cheesy material alert!): すき – I like you! 大すき – I like you a lot / I love you おいしいよ – This is delicious! おはよう – Good morning! オムライス – Omurice! チユー! – Mwah! Just as a warning, it is a lot harder than you think. 🙂 Me, I usually do a zigzag, or simply, a “heart”. Dig in!
Bonus – Omurice Presentation 2 – Sunflower
Step 1: Fry 1/3 of egg mixture above on the pan for 2-3 minutes over medium low heat.

Turn to other side for 2-3 minutes more. Until you have an egg sheet like this.

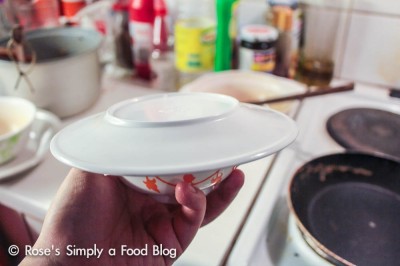
Step 2: Arrange the egg sheet in a bowl, like this.
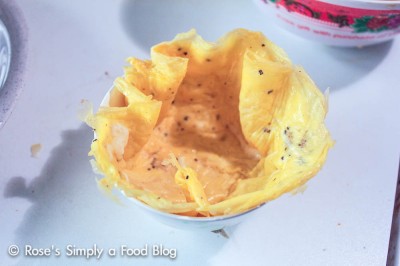
Step 3: Stuff it with rice, quite heavily is the way to go.
 Step 4: Wrap the leftover edges of egg sheet into the rice bowl.
Step 5: Flip the bowl over to a clean plate…
You will have this.
 Step 6: Use a sharp knife to make 3-5 shallow cuts through the egg wrap, like below.
  Step 7: Open it up like flower petals…
Step 8: Decorated with mayonnaise and ketchup in the center. Serve warm with side salad.

An edible flower, I am sure your kids will love this. 🙂 Me, I am a grown-up, and still find it too cute!
Until next time,
Rose.

thank you
LikeLike
Pingback: Okomiyaki – Japanese Add-All-You-Like Pancake – Goodbye May, and Hello June! | Simply a Food Blog